


Upgrading to polyurethane suspension bushings is one of the most cost effective upgrades you can make to your GTV6 or Milano. The stock rubber bushings wear out quickly, especially with spirited driving. Polyurethane bushings don't wear out and they more accurately control suspension movement and location, resulting in improved performance. Polyurethane bushings upgrades are the best place to start with suspension modifications. Your car will not be able to fully exploit other changes like stiff torsion bars or performance shocks with old worn out bushings!
If your Alfa's castor rod bushings are worn out, they will allow the rod to contact the chassis which causes the hole to become enlarged into an oval shape. This is expensive to fix, so don't drive the car with worn out castor rod bushings. Also, the stock bushings are made from a very porous rubber which traps water promoting rust. The polyurethane bushings eliminate both of these problems.
Powerflex's special polyurethane compounds are made with advanced materials with unique properties. Powerflex parts are engineered and specifically designed for improved performance, safety, and longevity. Upgrade your Alfa Romeo Alfetta, Giulietta, GTV6, or Milano/75 with high-performance Powerflex bushings to unlock its true handling potential without causing vibration or noise, and enjoy the peace of mind of Powerflex's Lifetime Warranty!
Fitment:
OE / OEM Cross Reference Numbers: 41322-AC040
60521263 / 60521264
Diagram Reference #2
INSTALLATION:

In this photo you can clearly see the castor rod.
This project is fairly easy and you will not need many tools. You will need a ratchet with sockets in 13mm, 17mm, and 19mm; you will also need a 17mm box or open end wrench, a flat head screw driver, pliers, a floor jack and jack stands. You will need to start by jacking the car up and removing the right front wheel.
At this point I need to talk about jacking the car up. Working on a jacked up car is dangerous, you could be injured or killed if you are not very careful. A brake disk falling on you with a 3000 pound car driving it can easily sever a limb. The car needs to be extra secure when doing suspension work because a lot of force will be needed to loosen various bolts and that could jostle the car enough to cause it to fall if it's not very secure. To make matters worse there are not a lot of jacking points on an Alfa or any other unit body car and on the Verde some of the jacking points are partially blocked by the plastic ground effects kit. It's quite easy to damage the car by improperly jacking it. I use a good floor jack and once the car is up I put a jackstand under it and throw the wheel under the car too just in case. If you have any doubts about how to jack up the car get help from a local Alfa expert.
Ok, once the car is jacked up and the wheel is off you need to use your flat head screw driver to separate the main air intake hose from the airflow meter. Now unlatch the top of the air cleaner box and lift it out of the way. Be careful not to damage the electrical wiring to the air flow meter. Look into the bottom section of the air cleaner box and locate the bolts holding it on. There are usually three 13mm bolts, remove them and lift the bottom of the air cleaner box out of the car.
Once the air cleaner is out of the way you can see where the castor rod protrudes into the engine compartment. It has a 19mm nut on it, a large washer and of course a bushing we will be replacing. Use your ratchet to remove the 19mm nut. Now remove the washer and bushing. You will probably need to rotate the washer counter clockwise to get it off. It's not threaded from the factory but years of riding the threads on the castor rod will have worn grooves into the washer so you will find that it spins off very easily. Once these parts are off return to the wheel well area
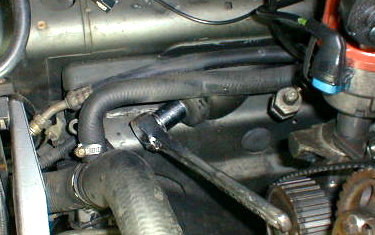
Here you can see my 19mm socket and ratchet on the nut in the engine bay. This is located below the air cleaner assembly.
Now in the wheel well we need to disconnect the castor rod from the upper link. It's attached by a 17mm bolt coming up through the bottom of the link and a 17mm nut on top. Some cars will have a cotter pin going through the bolt above the nut. If your car has the cotter pin, then get out your pliers and remove that pin. Get out your 17mm ratchet and box or open end wrench and put the socket on the bolt on the bottom of the link. There is not much room for the socket and ratchet, and you will not be able to turn it, but that's OK as you just need to hold it still. In some cases you will not have enough room to get to the bolt. If that's the case use your 13mm wrench to disconnect the shock from the lower suspension arm and move it out of the way. Now use your 17mm box/open end wrench to loosen and remove the nut on top. Once the nut is off strike the bolt with your ratchet and it will fall down. Get the nut and bolt then pull the castor rod toward the rear of the car and lift it out.
One the castor rod is out, remove the remaining bushing and washer. Not that the washer and bushing on the wheel well side DO NOT interchange with the washer and bushing from the engine bay side. Take a good look at the washers, they may be bent and deformed, that's no big deal however since they are out of the car you should fix them. Simply put them on a flat surface, like the concrete floor of a garage and smash them flat again with a sledge hammer. Now with a wire brush clean up the castor rod, especially the threaded areas.

Here is a cleaned up castor rod with two new bushings.
Now it's time to put it all back together with the new polyurethane bushings. The design of the bushing is excellent. It has a beveled edge on the washer side of the bushing as well as a reduced overall diameter when compared with the stock bushing. This is clever because it reduces the twisting force applied from the bushings to the chassis that occurs with suspension movement while allowing use of a stiff bushing to locate the arm solidly.
Putting this back together is simple. Put the rear washer (the one with the bigger hole) onto the castor rod. Next grab the bushing with the protrusion and coat both sides of it and the inside of its hole with lube. Now insert the metal sleeve into the bushing and slip it onto the castor rod. It needs to go on with the protrusion side forward since that will fit into the hole in the chassis. Now shove it into the hole in the chassis making sure it seats properly in the hole.

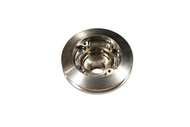
This is the hole where the Castor Rod mounts in the chassis. This one is in good shape but that's not always the case. If the bushings are worn out they will allow the rod to contact the chassis which causes the hole to become enlarged into an oval shape. This is expensive to fix, so don't drive the car with worn out Castor Rod bushings. Also, the stock bushings are made from a very porous rubber which traps water promoting rust. The polyurethane bushings eliminate both of these problems.
The next step is to attach the Castor Rod to the upper link. To do this, put the 17mm bolt back in through the bottom of the link. You will find that it will not line up with the hole in the Castor Rod but that's not a problem. Grab the brake caliper and pull it back and you will find you can move the upper link around enough to line the bolt up with the hole. Now put the nut back on and tighten it up and insert the cotter pin. If you car does not have a cotter pin then I suggest you use a NEW nylock nut and liquid thread lock. If you unbolted the shock earlier, bolt it back in place now.
Now return to the engine bay and take a good look at the castor rod. You should see the bushing from the wheel well side protruding through the hole. If not, go back to the wheel well and move the castor rod around until the bushing seats properly. Now put lube on the other bushing and slide it onto the Castor Rod on the wheel well side. The recessed area of that bushing should seat nicely into the protruding section of the other bushing. Now put the big washer back on; you may need to spin it clockwise. Now secure it with a NEW nylock nut and liquid thread lock. If you don't it WILL back off. As an alternative method you could use a double nut like the factory did on the GTV6's shock mounts and rear sway bar mounts. Put the air cleaner box back in and hook up the main air intake tube and you are done with the right side. The left side is just like the right except there is no air cleaner box to remove so it will go faster.

There it is, a nice clean Castor Rod with new polyurethane bushings.